Building SQL Server in Azure with Terraform
DevOps movement and CI/CD (continuous integration / continuous delivery) are getting more and more traction at the moment and I would like to show you how to build SQL Server in Azure, like infrastructure as a code with the use of Terraform.
Terraform is very popular an open-source tool to create and deploy infrastructure as a code. This tool is platform agnostic with a wide range of providers it can be used to implement infrastructure in the cloud platforms from Azure, AWS or Digital Ocean or even on-premises with VMware vSphere or Nutanix.
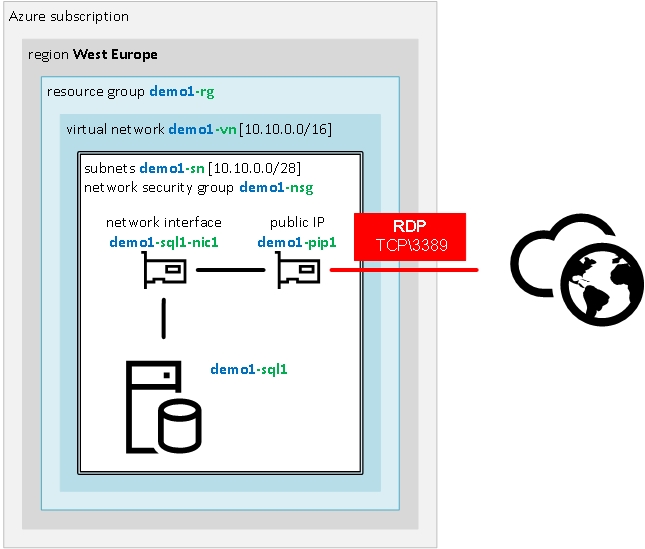
The main goal of this script is to build the environment with one stand-alone SQL Server 2016 accessible through RDP from home/office public IP address and introduce infrastructure as a code with the use of Terraform scripts.
The script is available in DBAinTheCloud, Github repository.
Prerequisites
Before we begin you will need access to Azure subscription and install the following software.
- Terraform (download)
- Terraform provider for Azure (download)
- Azure CLI (download)
- Text editor - VS Code (download)
- VS Code Terraform extension (optional) (download)
Application is a single executable and does not require installation however it is worth to add its location to the PATH system variable.
Terraform script (sql-server-basic.tf)
First of all, we are about to declare some variable and assign default values (example below) which we will be using across the script to streamline implementation and avoid potential errors. Please note that there are sensitive data (i.e. passwords) in .tf file, it is for demonstration purposes only and it will be amended in the future versions.
  variable "prefix" {
    default = "demo1"
  }
Before we create SQL Server we have to build underlying infrastructure.
resource group (doc)
Please note that we are referring to early defined variables with ${var.prefix} and ${var.location} code.
  resource "azurerm_resource_group" "rg1" {
    name = "${var.prefix}-rg"
    location = "${var.location}"
  }
network security group (doc)
Please note that we are referring to location and name of resource group from previous step with ${azurerm_resource_group.rg1.location} and ${azurerm_resource_group.rg1.name} code. This construct allows us to configure dependency between objects so terraform can create it in the correct order, other ways we will have to specify dependency manually with additional parameter depends_on = ["azurerm_resource_group.rg1"]
    resource "azurerm_network_security_group" "nsg1" {
      name = "${var.prefix}-nsg"
      location = "${azurerm_resource_group.rg1.location}"
      resource_group_name = "${azurerm_resource_group.rg1.name}"
    }
Network security group rule to allow RDP access from home IP address. This rule is to enhanced security and does not expose RDP port (tcp/3389) to the Internet.
  resource "azurerm_network_security_rule" "i1000" {
    name = "rdp-from-home"
    priority = 1000
    direction = "Inbound"
    access = "Allow"
    protocol = "Tcp"
    source_port_range = "*"
    destination_port_range = "3389"
    source_address_prefix = "${var.home-ip}"
    destination_address_prefix = "*"
    resource_group_name = "${azurerm_resource_group.rg1.name}"
    network_security_group_name = "${azurerm_network_security_group.nsg1.name}"
  }
virtual network (doc)
  resource "azurerm_virtual_network" "vn1" {
    name = "${var.prefix}-vn"
    location = "${azurerm_resource_group.rg1.location}"
    resource_group_name = "${azurerm_resource_group.rg1.name}"
    address_space = ["10.10.0.0/16"]
  }
subnet (doc)
  resource "azurerm_subnet" "sn1" {
    name = "${var.prefix}-sn"
    resource_group_name = "${azurerm_resource_group.rg1.name}"
    virtual_network_name = "${azurerm_virtual_network.vn1.name}"
    address_prefix = "10.10.10.0/24"
  }
With core infrastructure ready now we can start configuring the virtual machine. First, we have to configure a public IP address if we would like to connect with RDP session. This step is optional and required only if you would like to connect to the server directly.
public IP address (doc)
  resource "azurerm_public_ip" "pip1" {
    name = "${var.prefix}-pip1"
    location = "${azurerm_resource_group.rg1.location}"
    resource_group_name = "${azurerm_resource_group.rg1.name}"
    allocation_method = "Dynamic"
    idle_timeout_in_minutes = 30
  }
network interface (doc)
  resource "azurerm_network_interface" "nic1" {
    name = "${var.prefix}-sql1-nic1"
    location = "${azurerm_resource_group.rg1.location}"
    resource_group_name = "${azurerm_resource_group.rg1.name}"
    network_security_group_id = "${azurerm_network_security_group.nsg1.id}"

    ip_configuration {
      name = "${var.prefix}-sql1-ip1"
      subnet_id = "${azurerm_subnet.sn1.id}"
      private_ip_address_allocation = "Dynamic"
      public_ip_address_id = "${azurerm_public_ip.pip1.id}"
      }
  }
Virtual machine based on Microsoft image of SQL Server 2016 (doc)
  resource "azurerm_virtual_machine" "vm1" {
    name = "${var.prefix}-sql1"
    location = "${azurerm_resource_group.rg1.location}"
    resource_group_name = "${azurerm_resource_group.rg1.name}"
    network_interface_ids = ["${azurerm_network_interface.nic1.id}"]
    vm_size = "Standard_DS3_v2"
    delete_os_disk_on_termination = true

    storage_image_reference {
      publisher = "MicrosoftSQLServer"
      offer = "SQL2016SP2-WS2016"
      sku = "SQLDEV"
      version = "latest"
    }

    storage_os_disk {
      name = "${var.prefix}-sql1-disk1"
      caching = "ReadWrite"
      create_option = "FromImage"
      managed_disk_type = "Standard_LRS"
    }

    os_profile {
      computer_name = "${var.prefix}-sql1"
      admin_username = "${var.adminusername}"
      admin_password = "${var.adminpassword}"
    }

    os_profile_windows_config {
      provision_vm_agent = true
    }
  }
Implementing Terraform script - building infrastructure and SQL server
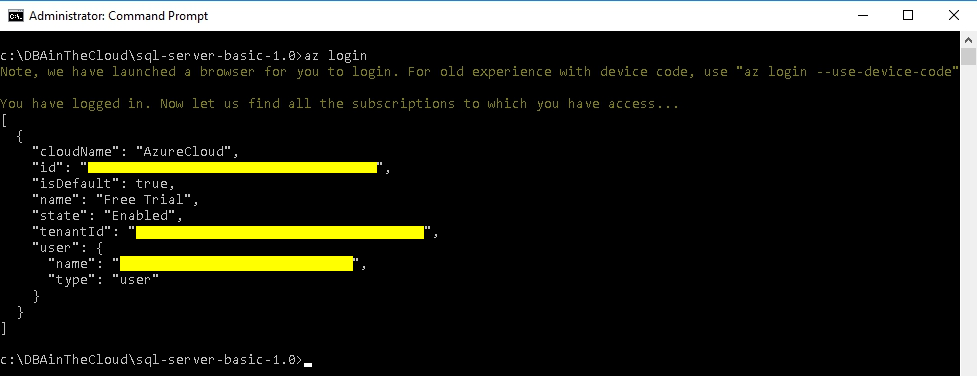
To implement Terraform scripts we will have to start the application in the folder containing configuration scripts. Before we begin implementing any scripts we have to connect to Azure subscription, with az login command. After successful authentication, we will see the following output.
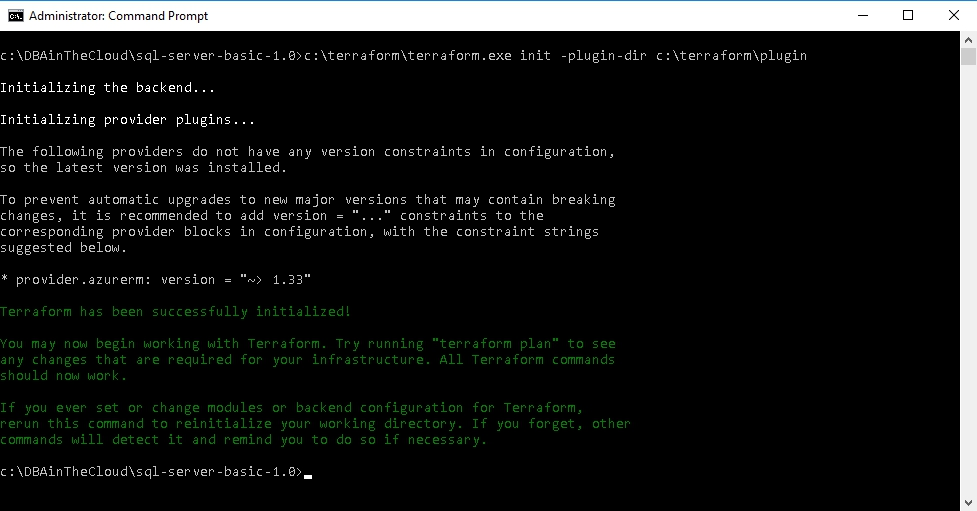
Then you have to initiate terraform with the following command. We are using Azure provider and terraform will download it during this step. If you are running Terraform in the environment with restricted internet access behind a proxy server you might need to specify proxy settings for your session (set HTTPS_PROXY=http://my.proxy.local:3128) or you have to download provider manually from terraform website (terraform-provider-azurerm). If you decide to use a local copy of provider you will have to specify a folder location with provider copy like in the example below running terraform init -dir-plugin c:\terraform\plugin command.
After successful initialisation, we can run a validation check to check out scripts for syntax errors. This step is optional as terraform will validate files for syntax errors before running any command.

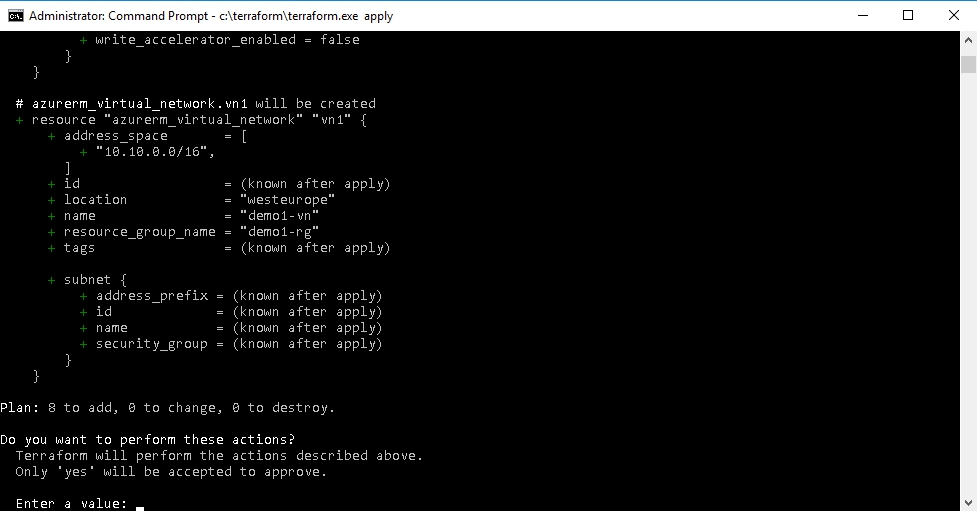
Now we can check what our script will build in Azure with terraform plan command. It will detail report including all the object will be created destroyed or changed in Azure.
Finally, we can apply our configuration to the Azure with terraform apply. Running this command without additional switches will run plan andwill display all changes and then it will prompt for confirmation like in the screenshot below.
After confirming build process will start and after successfull run you will see following summary.

Congratulations! You have just build environment with Terraform. You can check it at Azure portal and RDP to your server public IP address.
If you would like to check the public IP address from the command line rather than going through the web
portla please use following az command.
az network public-ip show -n demo1-pip1 -g demo1-rg
Destroying the environment
To remove everything we have to run terraform destroy command, it is very similar to apply, it will run plan first and display list of elements we are about to destroy and finally, it will prompt you for confirmation. After successfull run you will see following summary.

Coming next ...
Terraform is a very powerful and flexible tool. In the next post, I will describe how to run the entire process without any interaction to prepare it for automated deployment. I will also split the file into the smaller chunks, introduce .tfvars file and more variables.